

Changing your Apple Watch band is one of the easiest ways to give your smartwatch a fresh and stylish appearance. Whether you want a comfortable band for everyday use, a sporty strap for workouts, or an elegant design for special occasions, Apple Watch offers plenty of interchangeable band options. The best part is that you do not need professional assistance or special tools to replace your existing band. You can change it yourself in just a few minutes.
If you have recently purchased a new Apple Watch band or want to replace an old, damaged, or uncomfortable strap, understanding the correct process is important. Using the right technique helps you avoid scratches, prevent damage to the watch, and ensure that your new band is securely attached.
In this guide, you will learn how to change an Apple Watch band, how to remove the existing strap, how to install a replacement, and how to choose a compatible band for your particular Apple Watch model.
Why Change Your Apple Watch Band?
Apple Watch bands are designed to be interchangeable, allowing users to customize their watches according to their personal preferences and daily activities. You can easily switch between different styles without purchasing another smartwatch.
One common reason people change their Apple Watch bands is comfort. Some bands feel better during long working hours, while others are more suitable for sleeping, exercising, or outdoor activities. For example, a lightweight sport band can be a practical choice for running and gym workouts.
Another reason is appearance. A stylish leather band can make your Apple Watch look more professional, while a colorful silicone strap can create a casual and modern appearance. Metal bands can also provide a more traditional watch-like design.
Replacing an old band is another important reason. Over time, watch straps can become dirty, stretched, damaged, or uncomfortable. Installing a new band can improve both the appearance and comfort of your smartwatch.
What You Need Before Changing an Apple Watch Band
Before changing your Apple Watch band, make sure you have a clean and flat surface where you can safely place your device. A soft microfiber cloth or another non-scratch surface can help protect the watch display and case from accidental scratches.
You should also have your replacement Apple Watch band ready. Make sure the new band is compatible with your watch case size. Apple Watch bands are available in different sizes, and not every band fits every model.
It is also helpful to inspect the replacement band before installation. Check its connectors, edges, and locking mechanism to make sure nothing is broken or damaged.
You do not need a screwdriver, adhesive, or any special equipment. Apple Watch uses a built-in band release mechanism that allows you to remove and install compatible bands by hand.
How to Change Apple Watch Band Step by Step
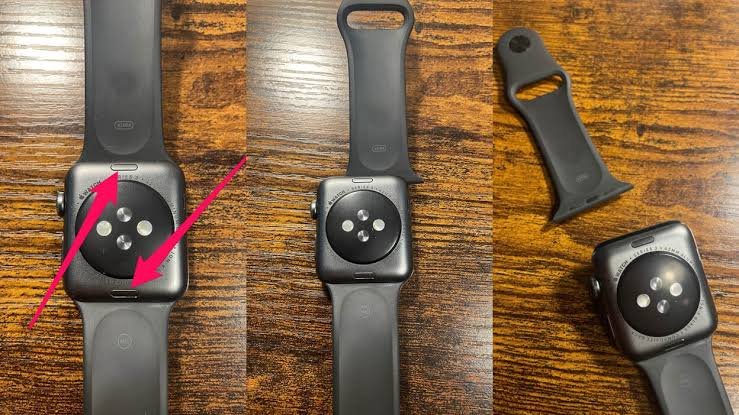
Changing an Apple Watch band is a straightforward process when you follow the correct steps. The watch has small release buttons on the back of its case that allow you to slide the band out of its connector.
Before starting, turn your watch over so that the back of the device is facing upward. This will help you locate the band release buttons and understand how the strap connects to the watch.
Step 1: Remove Your Apple Watch From Your Wrist
The first step is to remove your Apple Watch from your wrist. Never try to change the band while wearing the watch because it can make the process difficult and increase the risk of dropping or damaging your device.
Place the watch face down on a clean, soft surface. Make sure the display is protected from scratches and that you can comfortably reach the back of the watch.
If you are using a soft or flexible band, make sure it is not twisted or stuck around the watch case.
Step 2: Locate the Band Release Button
Once your Apple Watch is positioned correctly, look at the back of the device. You will notice a small release button near the area where the band connects to the watch.
Apple Watch has a separate release mechanism for each side of the band. These buttons allow you to remove the upper and lower sections independently.
The release buttons are designed to move slightly when pressed. You do not need to apply excessive pressure. A gentle but firm press is usually enough to activate the mechanism.
Step 3: Press and Hold the Release Button
Press and hold the band release button with your finger. While holding it down, gently slide the existing band sideways out of its slot.
The important thing is to keep the release button pressed while moving the strap. If you release the button too early, the band may become difficult to remove.
Do not pull the band directly away from the watch or use excessive force. The connector is designed to slide horizontally, so using the correct movement makes removal easier.
If the band does not move immediately, check that you are pressing the correct release button and try sliding it gently in the opposite direction.
Step 4: Remove the Other Side of the Band
After removing the first section, turn your attention to the other side of the Apple Watch.
Press and hold the second release button and slide the remaining band section out of its connector. Once both sections have been removed, your Apple Watch will be ready for the replacement strap.
Take a moment to inspect the band slots and connectors. If you notice dust or dirt, gently clean the area using a soft, lint-free cloth.
Avoid using sharp objects to clean the connector openings because they can damage the internal mechanism.
Step 5: Prepare Your New Apple Watch Band
Before installing the replacement strap, check that it is designed for your Apple Watch case size.
Most standard Apple Watch bands are available in two main compatibility groups. Bands designed for 38mm, 40mm, and 41mm cases are generally compatible with one another. Similarly, bands designed for 42mm, 44mm, and 45mm cases are generally interchangeable.
Apple’s newer 42mm and 46mm case sizes also require attention to band compatibility. Some bands are compatible across related size groups, but you should always check the manufacturer’s compatibility information before purchasing.
Make sure the new band is facing the correct direction. If it has a buckle, clasp, or decorative design, position it so that it will sit comfortably on your wrist after installation.
Step 6: Slide the New Band Into the Slot
Take one section of your new Apple Watch band and carefully align its connector with the band slot.
Slide the connector into the opening until it reaches the center position. Continue moving it gently until you feel or hear a click.
The band should move smoothly into place without requiring excessive force. If it feels stuck, remove it and check the alignment before trying again.
Never force a connector into the watch because an incorrectly positioned band can damage the attachment mechanism.
Step 7: Install the Second Band Section
Once the first section is installed, take the second section of your replacement band.
Align its connector with the remaining slot and slide it into position. Keep the connector straight while moving it into the watch.
Continue until the band reaches its locked position. Make sure both sections are installed correctly and that neither side appears loose or uneven.
Your new Apple Watch band should now be attached to the device.
Step 8: Check Whether the Band Is Secure
Before wearing your Apple Watch, check that the replacement band is properly locked.
Gently move each band section from side to side. It should remain securely attached without sliding out of the connector.
If one side moves unexpectedly or feels loose, remove that section and reinstall it carefully. Make sure the connector is aligned and that the release button returns to its normal position.
Once both sides are secure, your Apple Watch is ready to wear.
How to Know If Your Apple Watch Band Is Compatible
Compatibility is one of the most important things to consider when purchasing a replacement Apple Watch band. Although many bands fit multiple models, some designs are made specifically for certain case sizes.
Apple Watch bands generally use grouped case-size compatibility rather than requiring a completely different band for every watch generation.
Smaller case groups commonly include 38mm, 40mm, and 41mm models. Larger groups commonly include 42mm, 44mm, and 45mm models. However, newer case sizes and certain band designs may have different compatibility requirements.
For example, a band designed for an older 44mm Apple Watch may fit some newer larger models, depending on the official compatibility specifications.
You should also consider the type of connector. Most standard Apple Watch bands use a sliding connector, while certain specialty bands have unique attachment designs.
Checking the exact model and case size before purchasing can save you time and prevent compatibility problems.
How to Change an Apple Watch Sport Band
Sport bands are among the most popular Apple Watch accessories because they are lightweight, comfortable, and suitable for physical activities.
Changing a sport band follows the same general process as changing a standard Apple Watch strap. First, remove the watch from your wrist and place it on a soft surface.
Press the release button on the back and slide the existing sport band out of the connector. Repeat the process for the other section.
Take your replacement sport band and align its connector with the appropriate slot. Slide it into place until it locks securely.
Sport bands often use a pin-and-tuck or similar fastening design. Once the band is installed, adjust it to your wrist size to ensure a comfortable fit.
A properly fitted sport band should feel secure without being excessively tight. This is particularly important during exercise when your wrist may move frequently.
How to Change an Apple Watch Metal Band
Metal Apple Watch bands can provide a more premium and professional appearance. Some designs use a traditional buckle, while others feature magnetic or folding clasps.
The installation process depends on the connector design, but many standard metal bands attach using the same sliding mechanism as other Apple Watch bands.
Remove the existing strap by pressing the release button and sliding the connector out. Then align the metal band’s connector with the watch slot.
Carefully slide the new band into position until it locks.
Some metal bands include removable links that allow you to adjust their length. If the band feels too loose or too tight, you may need to remove or add links using the appropriate adjustment method.
Make sure the clasp closes properly and that the band is securely connected before wearing your watch.
How to Change an Apple Watch Leather Band
Leather Apple Watch bands are a popular option for people who prefer a classic and elegant style.
The installation process is similar to other standard bands. Remove the existing strap, locate the connectors, and slide the leather band into the appropriate slots.
Pay attention to the orientation of the leather sections. The buckle side and adjustment holes should face the correct direction so that the watch can be worn comfortably.
Leather bands require more care than silicone or metal alternatives. Avoid exposing them to excessive moisture, sweat, or harsh cleaning products.
If you regularly exercise or swim, consider using a sport band instead of a leather strap. This can help protect the leather from unnecessary wear and damage.
Common Problems When Changing an Apple Watch Band
Although replacing an Apple Watch band is usually simple, you may occasionally experience problems during installation or removal.
One common issue is a band that refuses to slide out. This can happen when the release button is not fully pressed or when the connector is positioned incorrectly. Try pressing the button again while gently sliding the strap sideways.
Another problem occurs when a replacement band does not fit into the connector slot. This usually means the band is incompatible with your watch case size or has not been aligned correctly.
A band may also slide into the watch but fail to lock properly. In this situation, remove it and inspect the connector for damage, dirt, or incorrect positioning.
Sometimes the release button becomes difficult to press. Dirt or debris around the mechanism may affect its movement. Clean the surrounding area gently with a soft, dry cloth.
If the release mechanism remains stuck or damaged, avoid forcing it. Contact Apple Support or an authorized service provider for assistance.
Tips for Keeping Your Apple Watch Band in Good Condition
Taking care of your Apple Watch band can help extend its lifespan and maintain its appearance.
Regular cleaning is important, especially if you wear your watch during workouts or outdoor activities. Sweat, dust, and everyday dirt can collect on the band and affect its comfort.
For many sport bands, cleaning with a nonabrasive, lint-free cloth and fresh water is suitable. Always follow the cleaning instructions for the particular band material.
Leather bands need additional attention because excessive water can damage their texture and appearance. Metal bands should also be cleaned carefully to avoid scratching or damaging their finish.
You should regularly inspect the connectors and locking mechanisms. If you notice cracks, loose components, or other signs of damage, replace the band before using it again.
Storing unused bands in a clean and dry place can also help prevent unnecessary damage.
Can You Change an Apple Watch Band Without Tools?
Yes, you can change most standard Apple Watch bands without using any special tools.
Apple designed its interchangeable band system to make replacement simple and convenient. The built-in release buttons allow users to remove and install compatible straps using their fingers.
You do not need a screwdriver, special equipment, or professional assistance for a normal band replacement.
However, certain specialty bands may require additional adjustment tools. For example, some metal bands have removable links that require a dedicated link-removal tool.
For regular silicone, sport, leather, and many metal bands, the standard sliding connector system is generally all you need.
How Often Should You Change Your Apple Watch Band?
There is no fixed schedule for changing an Apple Watch band. How frequently you replace or switch bands depends on your personal preferences, activities, and the condition of your accessories.
Some people change their bands every day to match their clothing or activities. Others prefer using the same band for several months.
If you exercise regularly, having a separate sport band can be useful. You can switch to a more formal leather or metal band when attending meetings, celebrations, or professional events.
You should replace a band whenever it becomes damaged, uncomfortable, stretched, or difficult to secure.
Regular inspection can help you identify problems before they affect the safety of your Apple Watch.
Is It Safe to Change an Apple Watch Band Frequently?
Yes, changing your Apple Watch band frequently is generally safe when you follow the correct installation and removal process.
The interchangeable connector system is designed to make band replacement convenient. You can switch between compatible straps whenever you want without affecting the watch’s normal functionality.
However, you should always handle the device carefully. Avoid pulling the band forcefully, pressing the release mechanism with sharp objects, or inserting incompatible connectors.
Make sure the watch is placed on a soft surface during replacement and that each new band is properly locked before wearing it.
Following these simple precautions can help protect your Apple Watch and keep its attachment mechanism working correctly.
Final Thoughts on How to Change Apple Watch Band
Learning how to change an Apple Watch band is a simple but useful skill for every Apple Watch owner. Whether you want a new appearance, improved comfort, or a replacement for an old strap, the process takes only a few minutes.
Start by removing your watch from your wrist and placing it on a soft surface. Press the band release button, slide out the existing strap, and carefully install your replacement band. Make sure the connectors are properly aligned and securely locked before wearing your watch.
Remember to check compatibility before purchasing a new band and choose a material that matches your daily activities. With proper installation and regular care, you can enjoy different Apple Watch styles while keeping your device safe and comfortable.
Ultimately, changing your Apple Watch band is an easy way to personalize your smartwatch without spending money on an entirely new device.